| lib | ||
| public/assets | ||
| src | ||
| .gitignore | ||
| index.html | ||
| package-lock.json | ||
| package.json | ||
| README.md | ||
🐱 Run The Cat
👩💻 Student Information
Name : Nadia Azzahra Putri Arvi
Student ID : 20210747
Email : nadia.arvi@kaist.ac.kr
Table of Contents
🎮 Game Description
Run The Cat is a puzzle-platformer game where players guide a cat through various levels using coding-like commands. The game teaches basic programming concepts through interactive gameplay.
How It Works
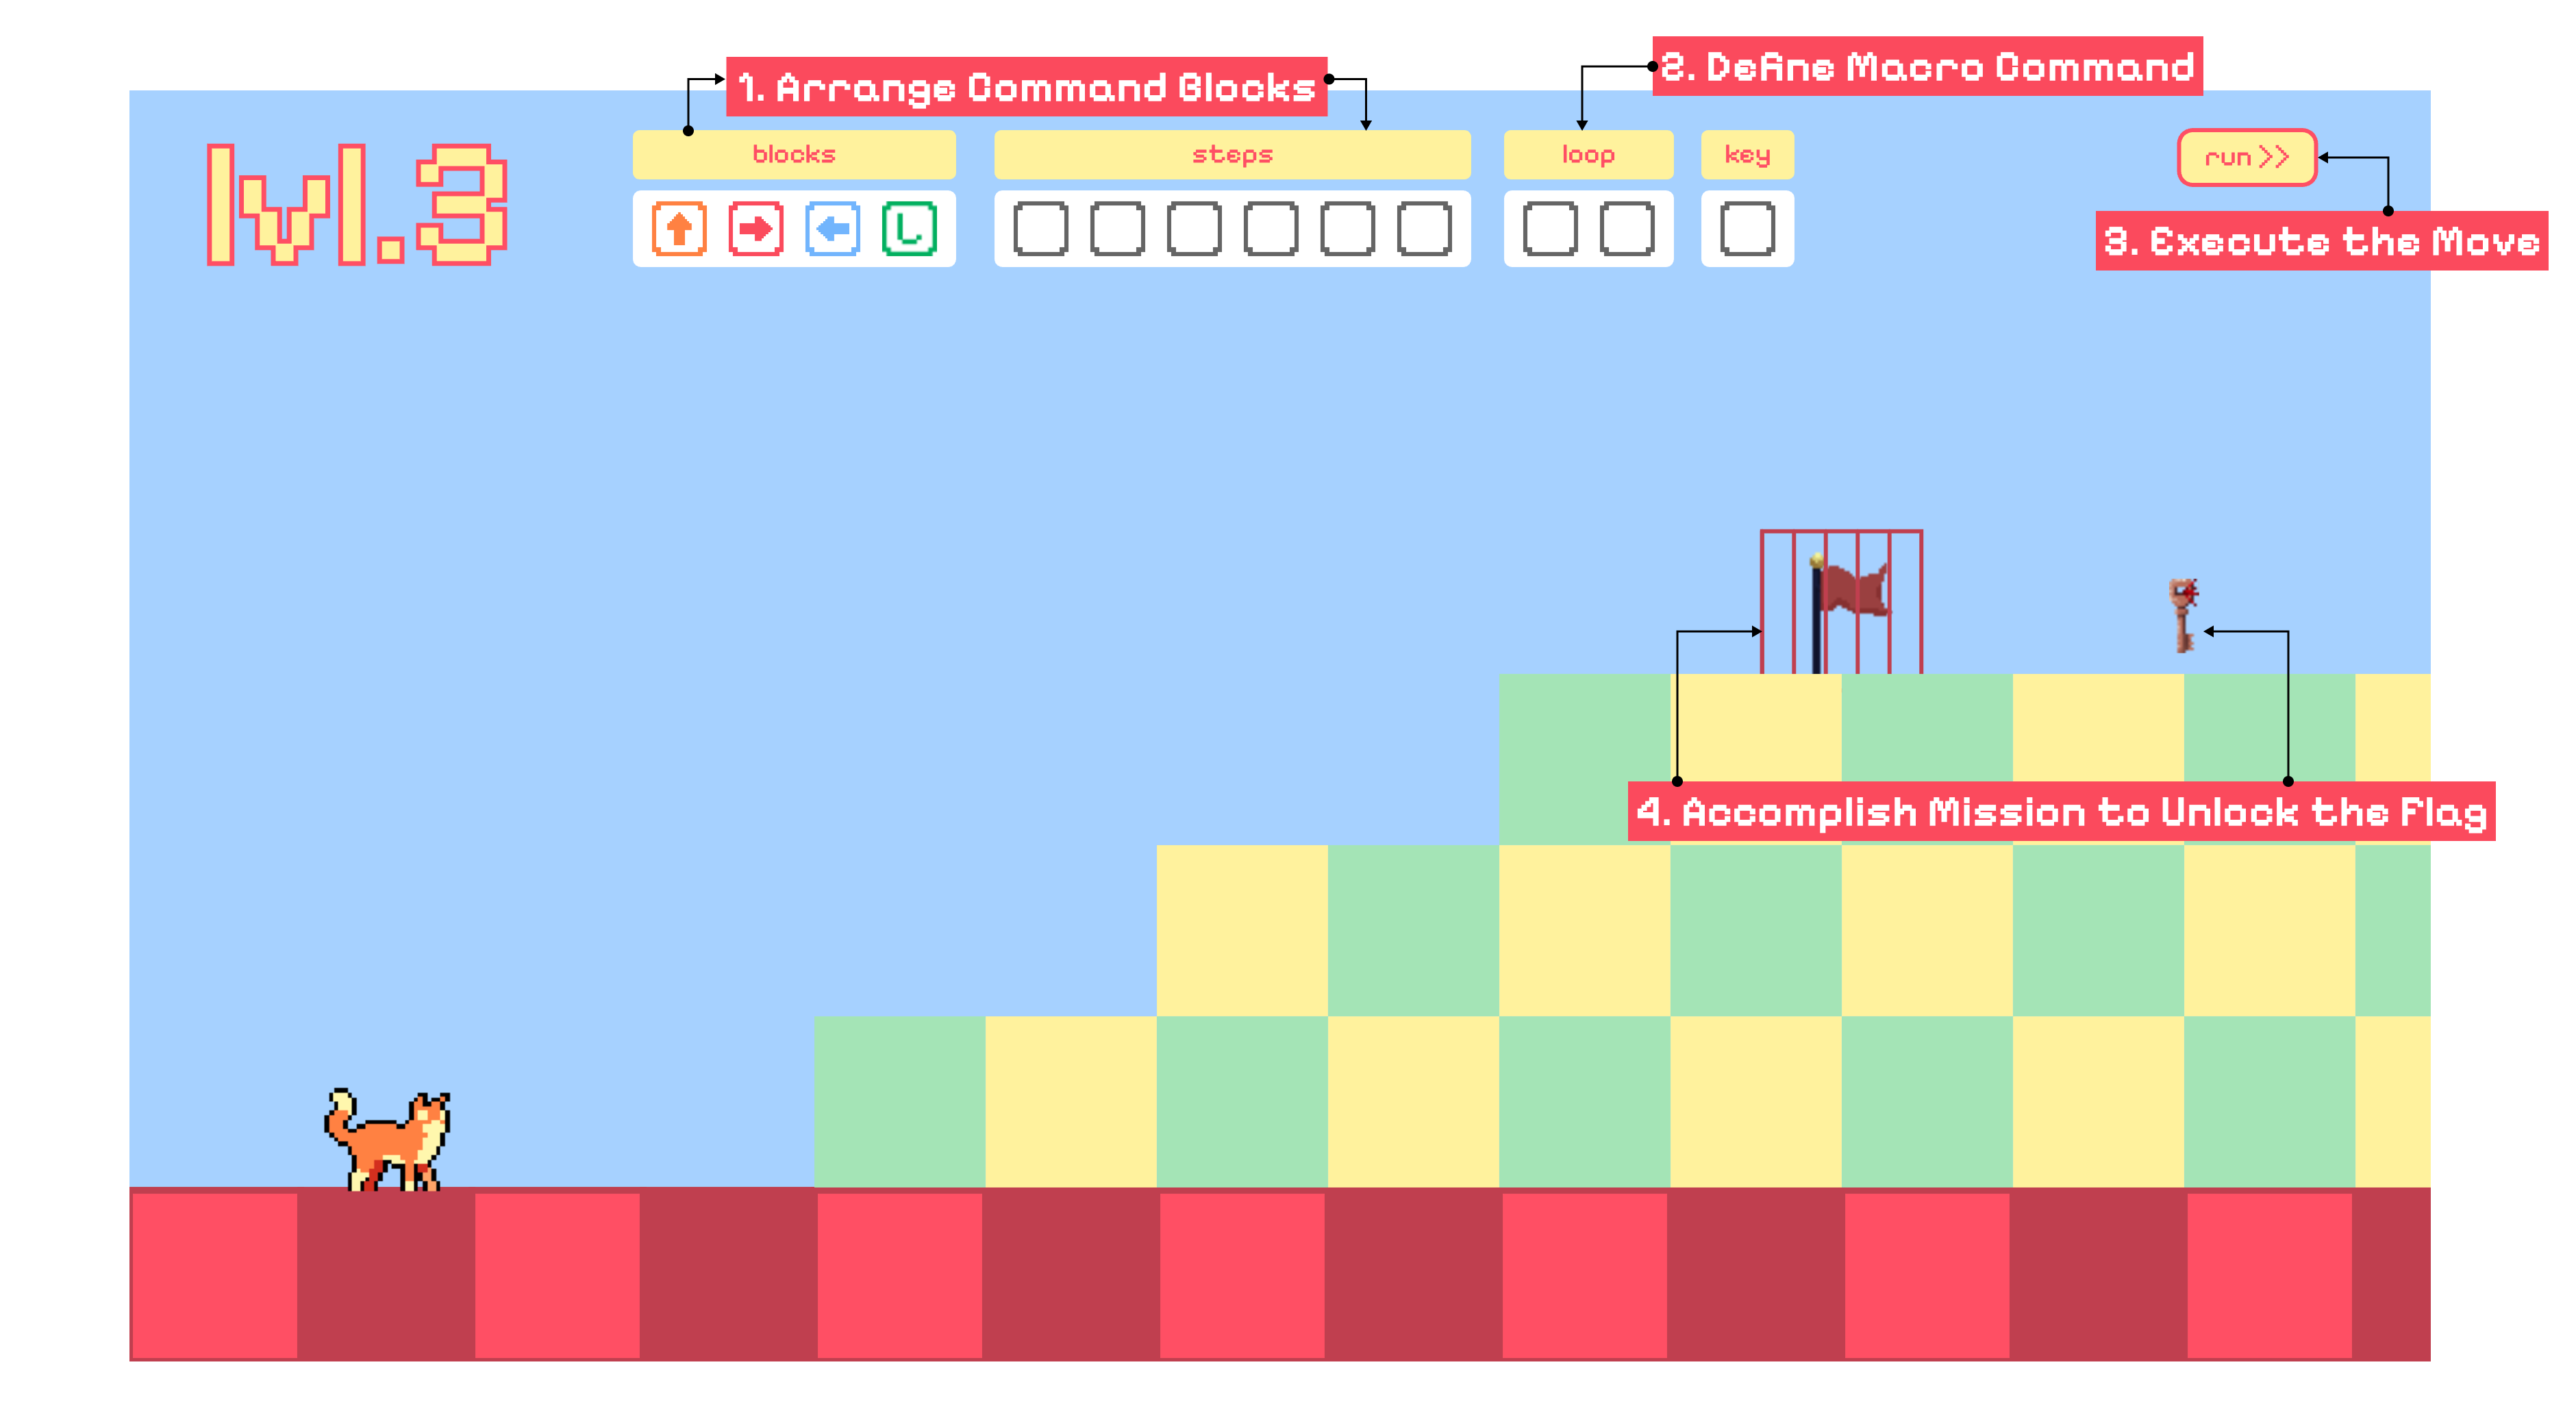
Figure 1. A snapshot of the game interface showing key UI components.
In this game, players must:
- Select commands from the
blockspanel — only these available blocks can be used. - Arrange the selected blocks into a sequence using the
stepspanel. - Define macro commands in the
looppanel to optimize and reduce repetition. - Execute the move using the
runbutton to guide the cat. - Collect keys and reach the flag to complete the level.
⚙️ Running The Game
To play the game, follow these steps:
- Clone the repository
git clone https://github.com/nadiarvi/run-the-cat.git
- Navigate to the project directory:
cd run-the-cat
- Install dependencies and start the game:
npm install
npm start
🔧 Code Organization
Core Components
Main Classes
SceneManager: Handles scene transitions and game stateCat: Controls player character physics and animationsKey/Flag: Interactive level elements
🐛 Known Issues
-
Restart Bug
After restarting a level, the cat's movement becomes slightly jittery, unlike on a fresh load. This is likely due to the sprite or state not being fully reset. A temporary fix is in place, but it may still cause minor visual glitches. -
Clickable Background After Completion
When a level is completed and the overlay is displayed, the background remains interactive. This allows players to accidentally trigger cat movement even though the game should not be playable.
✨ Special Features
No additional features beyond the core requirements were implemented.
📦 Tech Stack & Resources
🔧 Built With
| Tech | Description |
|---|---|
| Markup structure | |
| Styling and layout | |
| Game logic and interactivity | |
| Development tooling |
🕹️ Game Framework & Libraries
| Library | Purpose |
|---|---|
| Core game rendering and animation | |
| p5.SceneManager | Manage different game scenes and levels |
| p5.clickable | Create clickable UI elements (i.e. buttons) |
| p5.play | Sprite handling and physics engine |
🎨 Assets Used
| Asset | Source & Credits |
|---|---|
| 🐱 Cat Sprite | Free Street Animal Pixel Art Asset Pack by CraftPix.net |
| 🚩 Flag Animation | Free Flag with Animation by ankousse26 |
| 🔑 Key Sprite | FREE Pixel Art Key Pack – Animated by karsiori |
🐙💻 Repository Structure
run-the-cat/
├── README.md
├── index.html                   # Main HTML file to load the game
├── lib/                         # External libraries (p5.js, SceneManager, etc.)
│   ├── p5.clickable.js
│   ├── p5.js
│   ├── scenemanager.js
│   └── scenemanager_.js
├── package.json                 # Project metadata and dependencies
├── public/
│   └── assets/                  # Images, sprites, and other media assets
└── src/                         # Main source code
    ├── components/              # Reusable game components (Cat, Flag, etc.)
    ├── main.js                  # Game entry point
    ├── scenes/                  # Level or scene logic
    ├── style.css                # Styles for the game UI
    └── utils/                   # Utility functions and UI helpers
index.html: The entry point of the application, loading scripts and setting up the canvas.lib/: Contains third-party libraries such as p5.js, p5.clickable, and p5.SceneManager used to build game mechanics and UI. Some libraries are modified for compatibility.public/assets/: Stores game-related assets, including images, sprites, and screenshots used in the README.src/:components/: Contains the constructor of individual game elements. (e.g.Cat,Key,Flag)scenes/: Defines the logic for different game levels using p5.SceneManager.utils/: Provides shared helpers and UI tools such as common styling and themes.main.js: Initializes the game, sets up the canvas, and starts the first scene.style.css: Contains global styling HTML file.
🙏 Acknowledgements
All assets and libraries used have been credited in the 📦 Tech Stack & Resources section above. Code examples were referenced from the official documentation of the respective libraries. LLMs were used for debugging assistance.